If a team is trying to setup DKIM for Office 365, it usually means one of two things is already happening. Emails are landing in spam, or the team is trying to lock down the domain before spoofing and DMARC problems get worse.
The short version is simple. DKIM adds a cryptographic signature to outbound mail from Microsoft 365, and for custom domains that means generating two CNAME records, publishing them in DNS, enabling signing in Microsoft Defender, and then verifying that messages successfully pass in practice.
A clean setup matters because email authentication isn't just a security checkbox. It affects whether sales outreach, operational notices, and customer emails are trusted by Gmail, Outlook, Yahoo, and other providers.
What Is DKIM and Why It Matters for Office 365
DKIM (DomainKeys Identified Mail) is a digital signature attached to outbound email. It lets the receiving server verify that the message came from an authorized sender and that the content wasn't altered after it left Microsoft 365.
For Office 365 users, that matters because spam filters don't judge email on copy alone. They look for proof. If a custom domain sends mail without valid authentication, that domain looks less trustworthy. That creates deliverability problems and leaves the business more exposed to spoofing.
Microsoft's native support for DKIM on custom domains changed this from a painful setup into a straightforward one. The impact is real. Microsoft reported that enabling DKIM for custom domains reduced open DKIM failure rates by 72% and increased inbox placement rates for authenticated emails by an average of 18% compared to unauthenticated senders in its 2024 Email Security Report.
Practical rule: If a business sends from a custom domain in Microsoft 365, DKIM isn't optional. It's part of basic domain trust.
DKIM also supports the larger security stack. It helps DMARC work properly and makes spoofing harder. For teams reviewing broader protection, this overview on how to Secure your business email is a useful companion resource.
Prerequisites Before You Begin
Most failed setups don't fail because DKIM is complicated. They fail because the right access isn't ready before the work starts.
The cleanest approach is to gather everything first. That avoids switching between Microsoft 365, the registrar, and random password resets halfway through the process.
Access needed before setup
- Microsoft 365 admin access: The admin needs access to the Microsoft Defender portal at
security.microsoft.com. - DNS provider access: The person doing the setup needs login access to the public DNS host for the domain, such as GoDaddy, Cloudflare, or Namecheap.
- Verified custom domains: Only domains already added and verified in Microsoft 365 should be configured.
- A list of sending domains: Include the main brand domain and any subdomains or alternate domains used for real outbound mail.
A second check matters here. The DNS changes must be made at the external DNS provider, not on internal DNS infrastructure.
What should already be in place
A business should also know whether SPF is already configured. DKIM is one part of authentication, not the whole system. Teams that need to tighten Microsoft and Google sender authentication together should review this guide on SPF strategies for Google and Microsoft.
Missing DNS access is the most common operational blocker. The technical steps are fast once the registrar login is available.
Generating Your DKIM Keys in Microsoft 365
Microsoft 365 now handles DKIM key generation inside the Defender portal. That removes a lot of the old friction, but the admin still needs to pull the exact values from the right screen and use them without modification.

Where to generate the keys
The path in Microsoft 365 is:
- Sign in to Microsoft Defender
- Open Email & collaboration
- Go to Policies & rules
- Select Threat policies
- Open DKIM under email authentication settings
Another direct route is the DKIM portal page itself. To configure DKIM for Office 365, the admin must sign in to security.microsoft.com/dkimv2, select the custom sending domain, and click Create DKIM Keys to generate two unique CNAME records with the format selector1._domainkey and selector2._domainkey.
What Microsoft 365 generates
For each custom domain, Microsoft provides two CNAME records. These represent two selectors:
- selector1
- selector2
That isn't duplication for no reason. Microsoft uses both selectors so it can rotate signing keys without interrupting mail flow. The underlying implementation uses a 2048-bit RSA key pair, with the public key exposed through DNS CNAME records and the private key used by Microsoft 365 to sign outgoing mail.
A typical structure looks like this:
| Field | What it means |
|---|---|
| Host or Name | The selector for the domain, such as selector1._domainkey |
| Points to or Target | The Microsoft-provided destination tied to the tenant |
| Second record | The same pattern using selector2._domainkey |
What to copy carefully
Here, small mistakes cause big delays.
- Copy the exact host names: Don't shorten or rewrite them.
- Copy the exact target values: Microsoft generates tenant-specific values.
- Keep both selectors together: Publishing only one record creates trouble later during rotation.
- Use the values shown for that domain only: Don't reuse values from another domain in the same tenant unless Microsoft explicitly provides them for that domain.
The fastest way to break DKIM is to treat the selector values like a template. They aren't generic. They are specific to the domain and tenant.
Once those records are copied correctly, the next step happens entirely at the DNS provider.
Publishing DKIM CNAME Records in Your DNS
This step makes many admins hesitate, but it's usually straightforward once the fields are mapped correctly. The job is to publish the two Microsoft-generated CNAME records at the domain's public DNS host.

After generating the keys, the admin must publish both CNAME records at the external DNS hosting provider, ensuring the host name uses the exact Microsoft-provided selector names and that DNS propagation is allowed to complete before enabling signing, which can take minutes to a day according to Mimecast's Office 365 DKIM setup guidance.
What the DNS entry should look like
Most DNS providers show slightly different field labels, but the logic is the same.
| DNS field | What to enter |
|---|---|
| Type | CNAME |
| Host / Name | Microsoft-provided selector such as selector1._domainkey |
| Value / Target / Points to | The exact Microsoft destination for that selector |
| TTL | Leave the default if unsure |
The second record uses the same structure with selector2._domainkey.
Common DNS mistakes
A few errors show up repeatedly:
- Wrong record type: DKIM in this Microsoft 365 setup uses CNAME records, not TXT.
- Internal DNS instead of public DNS: The records must exist where the internet can resolve them.
- Trimmed hostnames: Some providers append the root domain automatically. Others don't. The admin needs to understand how that specific DNS panel behaves.
- Only one selector published: That creates future rotation issues.
Some DNS hosts are also awkward with _domainkey entries. Restricted or legacy providers can make this step harder than it should be.
Wait before enabling
Rushed setups often go awry on this point. DNS changes don't become visible everywhere instantly.
The practical move is to publish both records, then wait. Depending on the DNS host, that may be quick or slow. The verified data notes propagation delays can range from 5 minutes to 24 hours, and some providers update much faster than others.
Before moving on, it helps to visually confirm the values in the DNS panel and then give them time to spread.
A walkthrough can also help if the admin wants to see the flow on screen:
Publishing the records is only half the job. If signing is enabled before those records are visible publicly, Microsoft 365 can't produce a valid result.
Activating and Verifying Your DKIM Setup
Once the DNS records are live, the admin returns to Microsoft Defender and turns signing on for the domain. This is the step many people assume happens automatically after DNS is added. It doesn't.
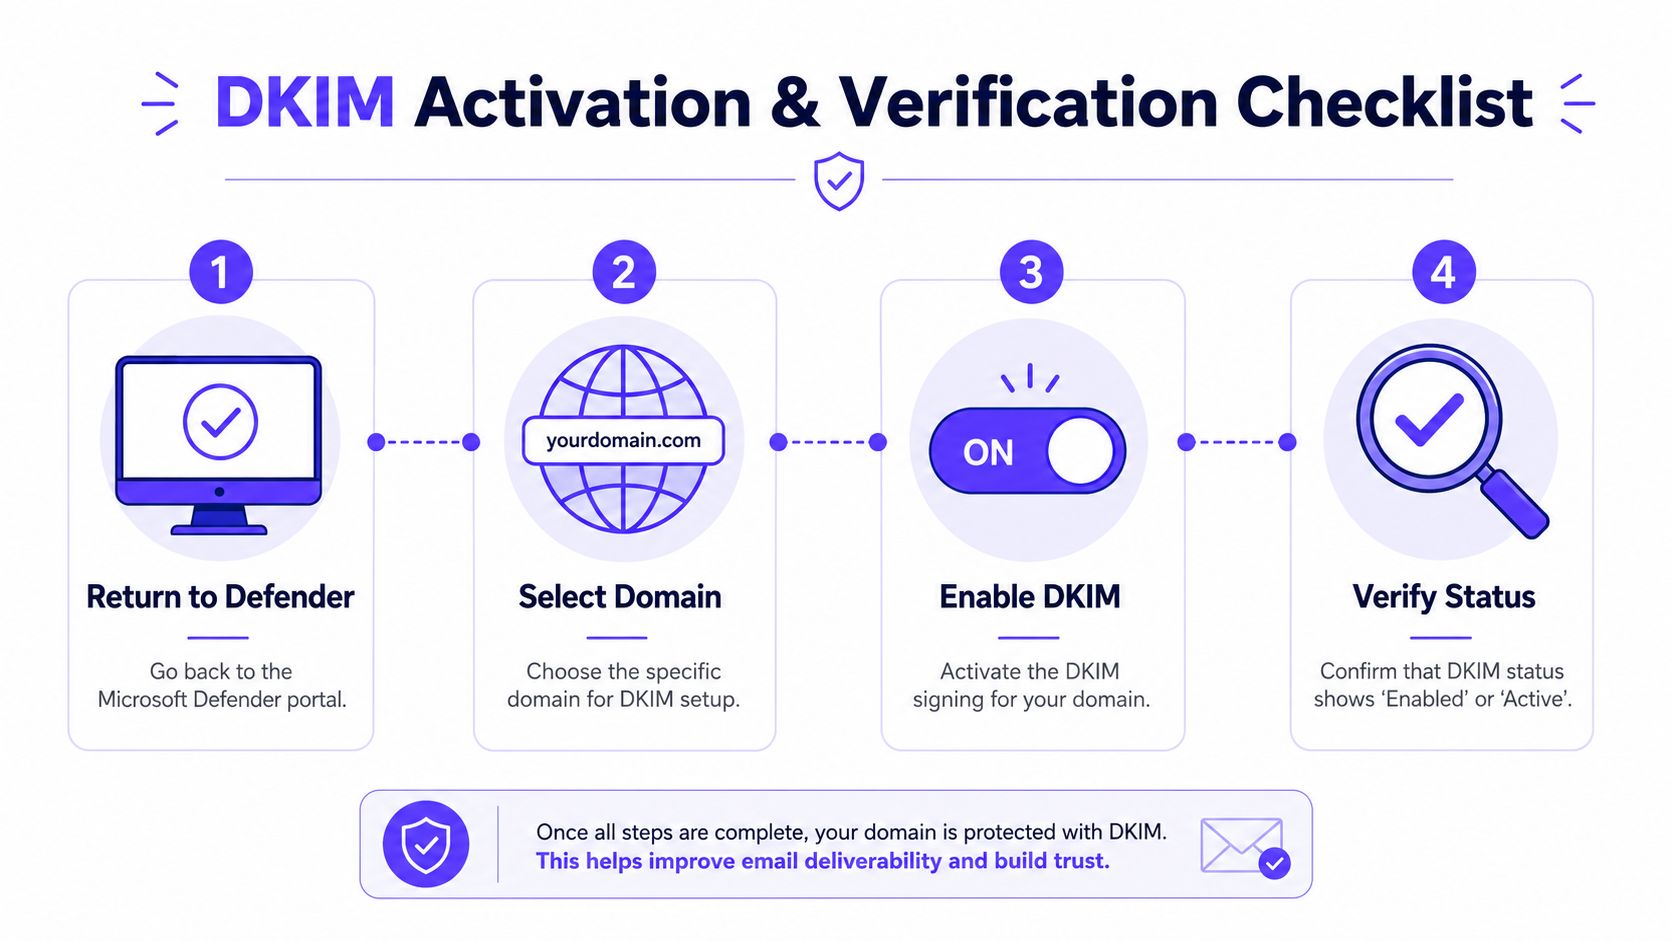
How to enable DKIM signing
Go back to the DKIM page in Microsoft Defender, select the domain, and toggle Sign messages for this domain with DKIM signatures to Enabled.
This step matters more than many guides admit. Implementation requires publishing exactly two CNAME records, then manually enabling signing in the portal. Verified data also notes that when teams report setup issues, a large share come from skipped enablement rather than broken DNS.
How to verify it properly
A green status in Microsoft 365 is helpful, but it isn't enough. Verification should happen on a delivered message.
Use this workflow:
- Send a test email from the Microsoft 365 mailbox on the custom domain to a Gmail account.
- Open the message in Gmail.
- Click the menu and choose Show original.
- Look for the DKIM-Signature header.
- Check the authentication result for dkim=pass.
- Confirm the
d=value matches the domain and thes=value matches the selector in use.
A common pitfall is enabling the signing feature before DNS CNAME records are fully propagated. Guidance from Duocircle's Microsoft 365 DKIM setup walkthrough recommends using MXToolbox DKIM Lookup or Gmail's Show Original to confirm record visibility before enabling signing and avoid immediate DKIM failure.
What to check if verification looks uncertain
Use two checks, not one:
- Header-level check: Gmail's raw message view shows whether the message passed DKIM.
- DNS-level check: A validator such as Mailwarm's DKIM checker can help confirm whether the selector records are publicly visible.
A DKIM setup isn't finished when the toggle is on. It's finished when a real mailbox shows
dkim=pass.
Troubleshooting Common Office 365 DKIM Problems
The most frustrating DKIM setups are the ones that look correct but still fail in production. That's common, especially when DMARC reports keep showing failures after DKIM has been enabled.

Data shows 63% of organizations enabling DKIM still experience DMARC failures due to hidden issues like secondary mail services not included in DKIM signing, according to Microsoft Learn's DKIM configuration guidance. That's the gap most basic tutorials miss.
Problem one, DKIM won't enable
If Microsoft Defender won't let the admin enable signing, the likely causes are operational:
- The CNAME records haven't propagated yet
- The hostnames were entered incorrectly
- The records were added at the wrong DNS provider
- One of the selectors is missing
The fix is boring but effective. Re-check the public DNS entries, confirm both selectors exist, and validate them externally before trying again.
Problem two, DKIM passes but DMARC still fails
This is the actual problem that catches teams off guard.
A domain can have valid Microsoft 365 DKIM and still fail DMARC because not every sender using that domain is signing the same way. Common examples include:
- Marketing platforms sending from the same From domain
- Recruiting tools sending through a separate infrastructure
- Support platforms that rewrite headers or sign with another domain
- Old systems still sending mail outside Microsoft 365
A practical diagnostic workflow
When messages still fail DMARC, this sequence works:
Check the failing message headers
Look atAuthentication-Results,DKIM-Signature, and the visible From domain.Compare the signing domain
If thed=value in DKIM doesn't align with the From domain, DMARC may still fail even when DKIM itself passes.Check the selector
If the header shows an unexpected selector, verify that both selector records exist publicly.Review message source
Confirm whether the mail came from Microsoft 365 or from another platform using the same brand domain.Inspect domain-by-domain
If different business units send through different systems, each sending path needs its own authentication review.
DKIM passing on one mailbox doesn't prove the whole domain is clean. It only proves that one sending path worked.
Problem three, records exist but validation tools disagree
That usually points to propagation timing, DNS syntax, or provider quirks. Some DNS hosts handle hostnames differently, especially around the root domain suffix. If one checker sees the record and another doesn't, the admin should verify the exact public record that resolves, not just the entry visible in the dashboard.
This is also where teams often discover that their DNS provider is the bottleneck, not Microsoft 365.
How DKIM Fits Into Your Overall Deliverability Strategy
DKIM is foundational, but it doesn't carry deliverability on its own. A healthy sending setup depends on three protocols working together: SPF, DKIM, and DMARC.
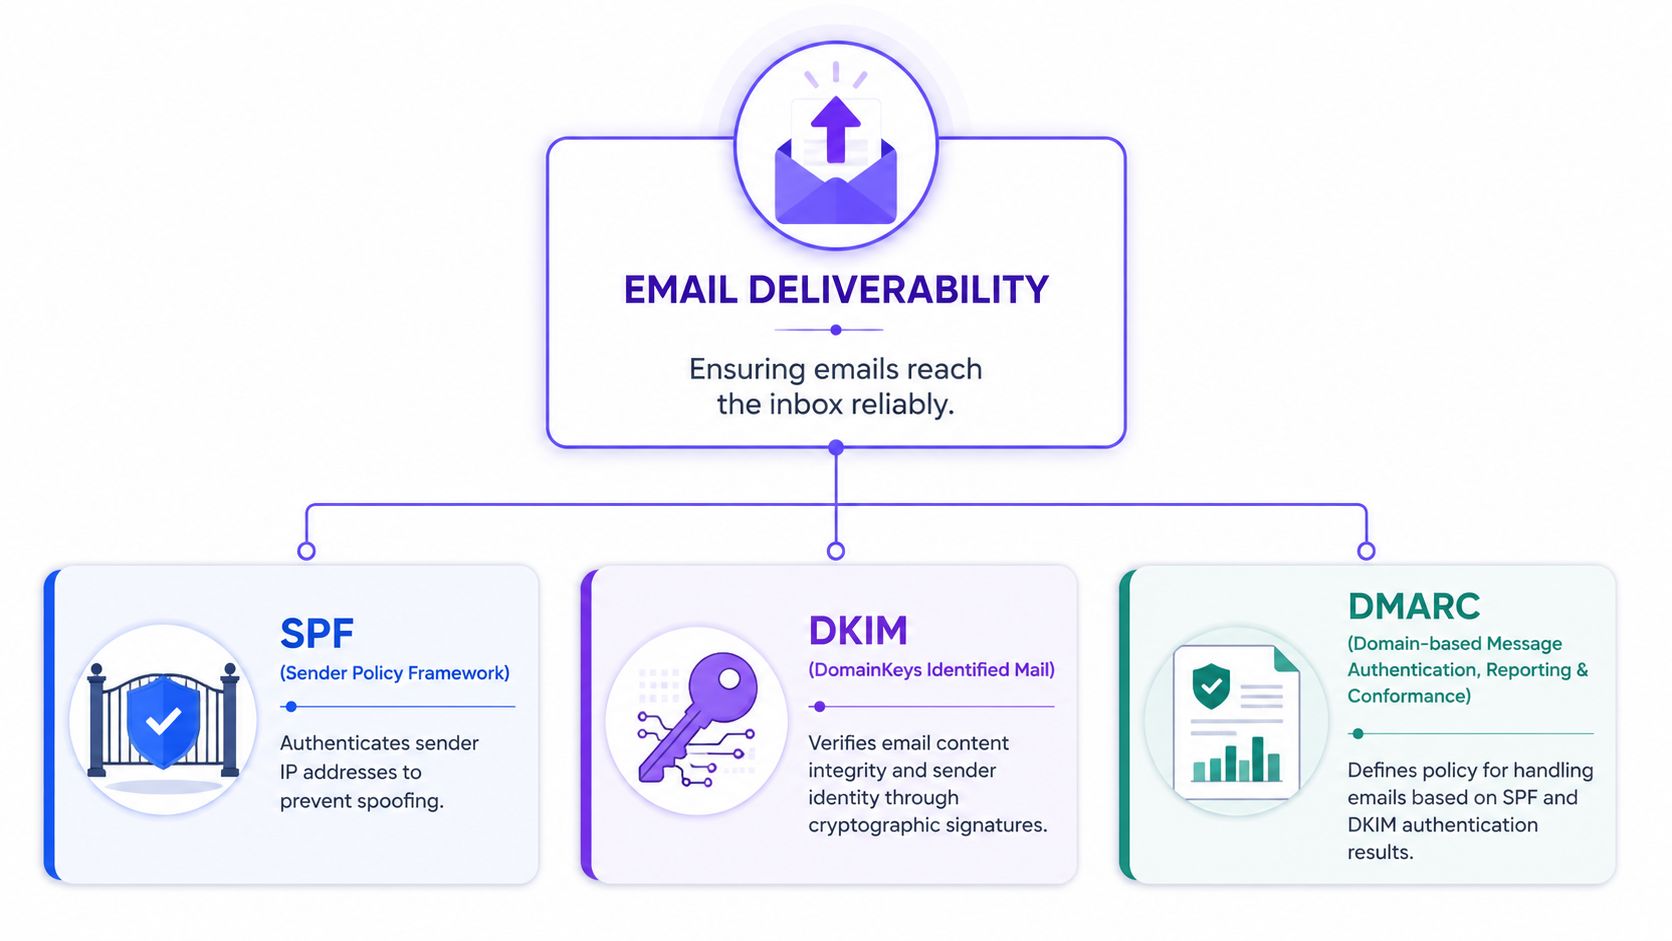
What each protocol does
| Protocol | Core job | Why it matters |
|---|---|---|
| SPF | Authorizes sending servers | Helps receiving systems recognize approved senders |
| DKIM | Signs message content | Proves integrity and domain responsibility |
| DMARC | Applies policy and alignment | Tells providers what to do when authentication fails |
A domain with only one of these in place is still exposed. DKIM proves the message was signed, but DMARC decides whether that signature aligns with the visible From domain in a way mailbox providers trust.
Why deliverability doesn't end at setup
Authentication gets a domain into the conversation. It doesn't finish the job.
Mailbox providers also look at:
- Sender reputation
- Engagement quality
- Complaint patterns
- Bounce behavior
- Consistency across providers
That matters for founders, SDR teams, agencies, recruiters, and marketing teams alike. A technically valid domain can still underperform if the reputation around it is weak.
Where Microsoft 365 protection fits
For teams tightening the Microsoft mail stack, Exchange Online Protection is part of the wider picture. This guide to EOP features is useful for understanding how Microsoft handles filtering and protection around the messages a domain sends and receives.
The practical takeaway
A business shouldn't treat DKIM as a one-time DNS task. It should be treated as part of an ongoing deliverability system.
That means:
- Set up SPF, DKIM, and DMARC together
- Verify with real mailbox header checks
- Review every platform sending from the domain
- Monitor inbox placement, not just send volume
- Work on reputation after authentication is complete
Teams that need to go beyond setup and improve placement over time should focus on the broader discipline of avoiding the spam folder. Authentication is the start. Reputation and monitoring are what protect results over time.
Frequently Asked Questions About Office 365 DKIM
How do you setup DKIM for Office 365 on a custom domain
Generate the DKIM keys in Microsoft Defender, publish the two CNAME records at the external DNS provider, wait for propagation, then enable signing for the domain. After that, send a test email and inspect the headers to confirm DKIM is signing correctly.
How long does Office 365 DKIM setup take
The Microsoft side is usually quick. Most delays come from DNS propagation, which can take minutes to a day depending on the provider and DNS behavior.
Why does DKIM pass but DMARC still fail
That usually means another service is sending email with the same domain but isn't signing in a way that aligns with DMARC. Marketing tools, support systems, and old outbound platforms are common causes.
Do both DKIM selectors need to be published
Yes. Microsoft 365 generates two selectors so it can rotate keys safely. Publishing only one creates avoidable problems later when the active signing selector changes.
Is DKIM enough to fix deliverability
No. DKIM is necessary, but it isn't sufficient on its own. SPF, DMARC, sender reputation, engagement quality, and sending behavior all affect inbox placement.
What should be checked after enabling DKIM
A real delivered message should be checked in Gmail or another mailbox that exposes raw headers. The admin should confirm a DKIM signature is present and that the authentication result shows a pass for the correct domain.
Can third-party tools break DMARC after Microsoft 365 DKIM is configured
Yes. If another service sends on behalf of the same domain and doesn't align DKIM or SPF correctly, DMARC can still fail even though Microsoft 365 itself is configured properly.
How does Mailwarm help improve sender reputation
Mailwarm helps senders build reputation, monitor inbox placement, and improve deliverability through real inbox engagement, advanced warmup controls, and expert guidance. It's built for teams that care about real inbox placement, not just automated warmup activity.
If email is part of a company's growth strategy, Mailwarm helps senders build reputation, monitor inbox placement, and reduce spam risk with expert-guided warmup. Mailwarm is a premium email warmup and deliverability platform built for teams that care about real inbox placement, not just automated warmup activity. It goes beyond basic warmup by combining real inbox engagement, provider-level warmup, spam score monitoring, inbox placement insights, authentication fix tools, bounce prevention, deliverability analytics, and expert deliverability calls in every plan. Unlike basic warmup tools, Mailwarm doesn't require IMAP access or permission to read the user's private inbox.